• Tutorials
  • Ikea Hacks
  • Free Printables
  • Holiday
  • Handmade Gifts
  • Etsy Business

EverythingEtsy.com

Etsy Blog | Selling on Etsy | Etsy Banners | Giveaways & Creative Stuff

You are here: Home / Tutorials / Felt Taco Pins Tutorial {Felt Flair Goodness}

Felt Taco Pins Tutorial {Felt Flair Goodness}

By Kim Layton 7 Comments

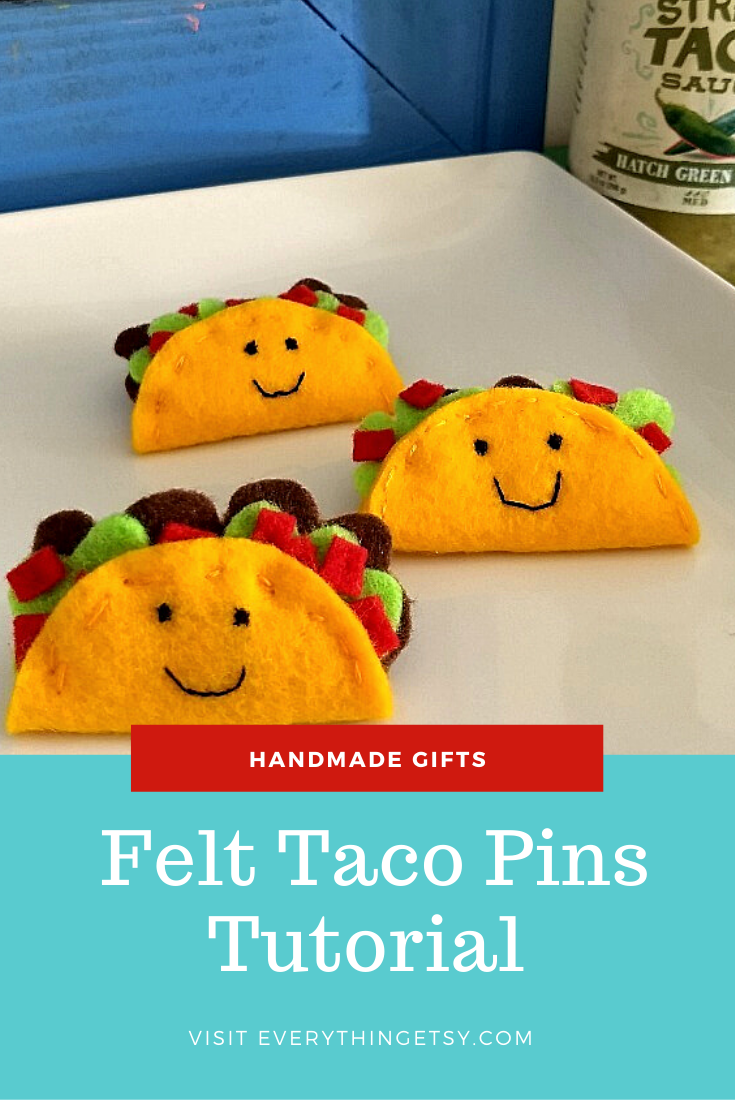
Looking for a quick project?  Check out this spicy little felt taco pin!  Dress up your jean jacket or add a bunch to a backpack. They’re sure to make you happy!

Create hair clips by attaching small snap clips to the back instead of the pin back.  Easy peasy!

One more idea…you can find a giant plushie taco pillow pattern in my new book right here.

Felt Taco Pins Tutorial -- EverythingEtsy.com 1

I’d love to share with you how I made these little cuties.

Felt Taco Pin Supplies - EverythingEtsy.com

You’ll see these simple supplies…

  • 2 – 2 1/2” squares of yellow felt
  • 1 – 1” x 2” piece of brown felt
  • 2 – 1 1/2” squares of light green felt
  • 1 – strip of red felt {see above}
  • Yellow embroidery floss
  • Red embroidery floss
  • Black embroider floss
  • 1 – small metal pin back

Felt Tacos - Felt Flair - Cut it up - EverythingEtsy.com

See the above image to see how each piece should be cut.  It’s really rather simple and you can’t mess up.  Tacos are easy going and no two look alike.  That’s one of the reasons they’re awesome!

Felt Taco - EverythingEtsy.comTake one of the yellow circles and attach the pin back with the yellow embroidery floss.

Felt Taco Pins - Stack it - EverythingEtsy.com

Use a running stitch and yellow embroidery floss as you secure the two yellow circles together.

Then stack the taco meat, the two pieces of lettuce, and sprinkle the tomato pieces on the top.  Make sure they will stick out of the top a tiny bit when you fold it.

Adjust everything to make your taco look super yummy.

Then use the red embroidery floss to add single stitches in each tomato piece securing all the layers of your taco with each stitch.  This will hold everything in just right.

Felt Tacos - Give it life - EverythingEtsy.com

Stitch the happy taco face using black embroidery floss.  See the above photo for the placement.

Felt Taco Pin -- Tutorial on EverythingEtsy.com

Fold it and add a few extra stitches of yellow around the taco to secure it closed.

Felt Taco Pin Tutorial on EverythingEtsy.com

Cute, right?!

Felt Taco Pins Tutorial on EverythingEtsy.com

Make a bunch and share them with your friends!

What do you think?  Do you like to work with felt?

I have 3 felt craft books published and one more coming soon!  So, I guess you can say I like to work wih felt!  I’ll be sharing all the book details on that soon.

Have fun with this simple project that’s big on the awesomeness scale!

~Kim

P.S.  If you need a few {or a hundred} more crafty tutorials visit our Tutorials Gallery right here.

Related posts:

  1. 101 Handmade Baby Gift Tutorials
  2. 15 Back-to-School Projects {DIY Ideas}
  3. 7 DIY Wallet Patterns
  4. DIY Beach Coverups to Make Now!

Filed Under: Tutorials Tagged With: brooch, crafts for teens, diy, felt, felt crafts, felt tutorial, hair clip, Handmade, kids, pin, sewing, stitching, taco, taco tuesday, Tutorials

Comments

  1. Seana Turner says

    February 1, 2018 at 9:22 am

    These are so cute… they would be a perfect Girl Scout “swap” project. So happy and fun, and no mess. Plus a great way to use up small scraps of felt from other projects:)

    Reply
    • Kim Layton says

      February 17, 2018 at 5:48 pm

      Great idea! It takes the smallest amount of supplies and it’s fun. I love that about little felt projects! Thanks so much for you comment!

      ~Kim

      Reply
  2. Sam says

    March 5, 2018 at 3:53 pm

    Hello, Amazing post!
    Wow these are cute and awesome. Because of these awesome tutorials. I love your website

    Reply
  3. Diana Lopes says

    March 27, 2018 at 2:25 pm

    Omg, these look so cute!! I love this idea, thank you for sharing!

    Reply
  4. Abre says

    May 14, 2018 at 4:26 pm

    So cute. With this idea comes the idea that we can make every food like it.

    Reply
  5. Ann Black says

    October 14, 2019 at 5:58 pm

    Why do you sew two circles together? Why not just use one circle?

    Reply
    • Kim Layton says

      October 15, 2019 at 12:35 pm

      It’s much stronger that way so the pin on the back doesn’t hang funny. I also like the thick look of it. Try it both ways and see which one you like. Thanks for stopping by!

      ~Kim

      Reply
Previous Post Winter DIY Gifts {Etsy Finds}
Next Post 12 Etsy Shipping Station Tips & Ideas {Etsy Business}

Leave a Comment Cancel reply

Your email address will not be published. Required fields are marked *

This site uses Akismet to reduce spam. Learn how your comment data is processed.

  • Bloglovin
  • Facebook
  • Instagram
  • Pinterest
  • Twitter

Never miss a post:

Enter your email address:

Sell doTERRAEssential Oils How to Start a Blog for Your Etsy Business


follow EverythingEtsy on Pinterest


Disclosure: Various posts and pages on this site include affiliate links. We could earn a referral fee if you make a purchase through those links. Your purchase won't cost you more because you followed our link and we only refer you to sources we can personally recommend.

RSS Now at HandmadeandCraft.com

  • 12 DIY Kitchen Ideas
  • 15 Easter Cupcake Recipes
  • Organize with a Chalkboard Wall Calendar!

RSS Now at KimberlyLayton.com

  • St. Patrick’s Day Crochet Shamrock Pattern & Video Tutorial
  • Printable Coloring Pages for St. Patrick’s Day
  • How to Get Your Business Featured on Blogs

[footer_backtotop]

Copyright © 2025 EverythingEtsy.com · All Rights Reserved · Privacy Policy ·


The term "Etsy" is a registered trademark of Etsy, Inc. - This site is not affiliated w/ Etsy, Inc.
This website uses cookies to improve your experience. We'll assume you're ok with this, but you can opt-out if you wish. Cookie settingsACCEPT
Privacy & Cookies Policy

Privacy Overview

This website uses cookies to improve your experience while you navigate through the website. Out of these cookies, the cookies that are categorized as necessary are stored on your browser as they are essential for the working of basic functionalities of the website. We also use third-party cookies that help us analyze and understand how you use this website. These cookies will be stored in your browser only with your consent. You also have the option to opt-out of these cookies. But opting out of some of these cookies may have an effect on your browsing experience.
Necessary
Always Enabled
Necessary cookies are absolutely essential for the website to function properly. This category only includes cookies that ensures basic functionalities and security features of the website. These cookies do not store any personal information.
Non-necessary
Any cookies that may not be particularly necessary for the website to function and is used specifically to collect user personal data via analytics, ads, other embedded contents are termed as non-necessary cookies. It is mandatory to procure user consent prior to running these cookies on your website.
SAVE & ACCEPT